
Adobe After Effects is arguably one of the most powerful creative tools (read: animation and visual effects software) available for professionals, particularly motion designers and VFX artists. If you’re a beginner or pro designer (does that even matter?), once you start to use After Effects religiously, you’ll recognize how super important it is to optimize your work.
Useless keyframes, tedious routines and rendering glitches (among others) are, quite literally, a headache. Besides, these nifty little things can slow you down in ways you don’t even realize. Now, the question is, how can you speed up your workflow in AE?
While there are several ways, After Effects hotkeys are definitely a great way to go about this. They’ll help you work faster and keep you from getting stuck looking for that buried panel. Bottom line: they simply rock!

Check our Motion Beast course.
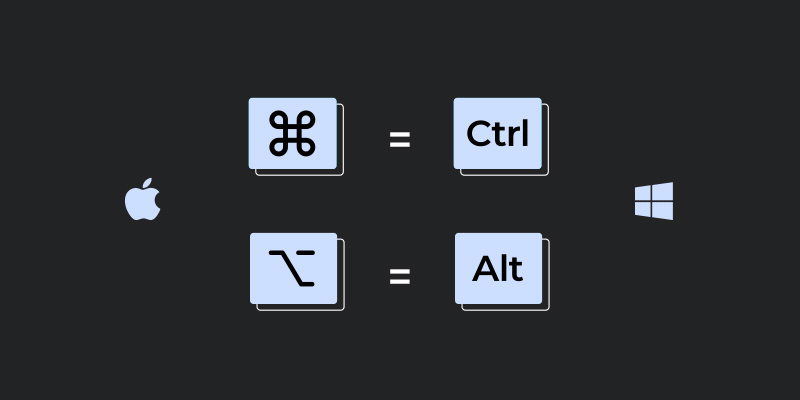
In this article, we present our definitive list of the most important After Effects keyboard shortcuts, and what actions you can perform with them. You’ll spend less time opening right-click menus and hopping between tabs by memorizing these essential After Effects shortcuts. Remember, we’ll mainly be using three special keys (i.e., Command, Option and Shift) for all keyboard shortcuts on a Mac. So, here’s a quick note: if you’re working from a Windows PC, you’ll have to replace Command with Control and Alt with Option for this guide.
General After Effects Shortcuts
Just like with every other software, After Effects shortcuts are a combination of two to three keys—rarely more. Instead of wasting your time looking for a particular tool or function on that overwhelming interface, it’s faster and more convenient to use these After Effects hotkeys.
1. After Effects Shortcuts: Transform Properties
Shortcut: APSRT
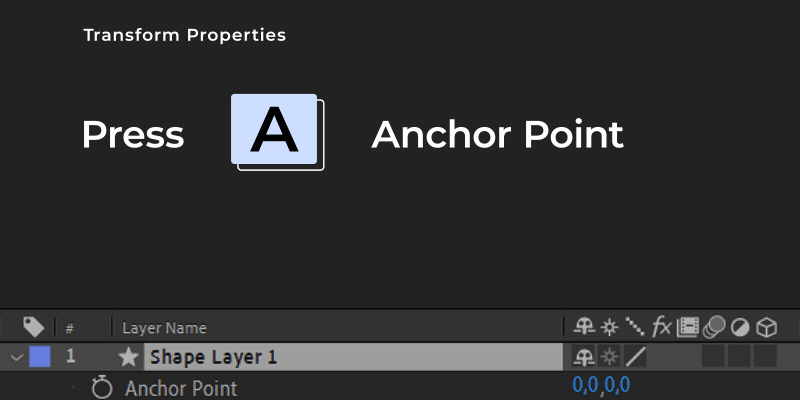
If you want to transform an object, simply hit APSRT to call up the transform properties instead of using the dropdown menu. Confused? Well, A stands for Anchor Point, P for Position, S for Scale, R for Rotation, and T for Opacity.
2. Opacity Shortcut After Effects
Shortcut: Control + Option + (+ or –)
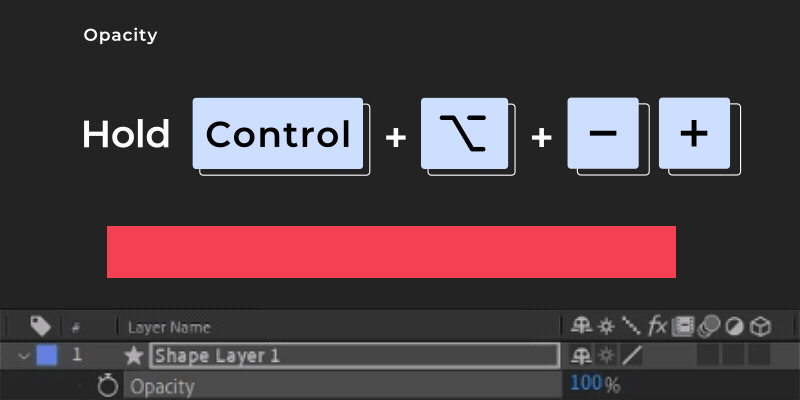
In case you’re wondering why the After Effects Opacity Shortcut is T, that’s because opacity is the opposite of transparency. If you want to manually adjust a selected layer’s opacity by 1%, simply use Control + Option + (plus or minus) on the numeric keyboard.
3. After Effects Keyboard Shortcut: Rename
Shortcut: Return
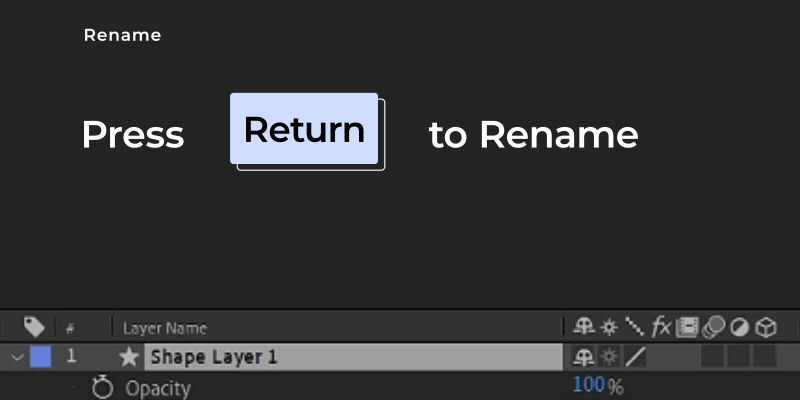
If you want to rename an object, layer, composition, effect, group, mask or folder, simply select it and press Return on the main keyboard.
4. Set a Marker on the Timeline
Shortcut: Control + 8 or *
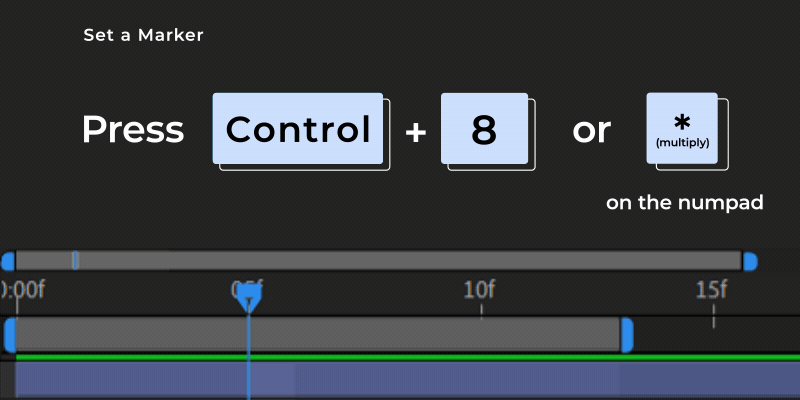
Markers can help you set a reference point, so you can track your animation’s timings and progression. A good example is being able to sync your animation to music. Wondering how to add a marker in After Effects? For Mac OS, simply hit Control + 8 on the main keyboard. Or you could use * (multiply) on the numpad for both Windows and Mac OS.
Once you set a marker, you can double click on it to add comments, links, etc. To remove a marker, simply Command-click on it.
5. Duplicate Objects
Shortcut: Command + D
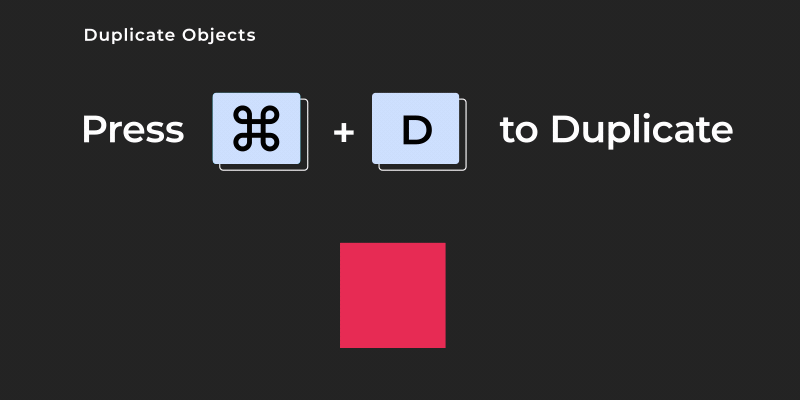
To duplicate any selected object (i.e., layers, masks, effects, text selectors, animators, puppet meshes, shapes, render items, output modules, or compositions) in After Effects, simply press Command + D.
6. Quickly Use the Hand Tool
Shortcut: Space Bar
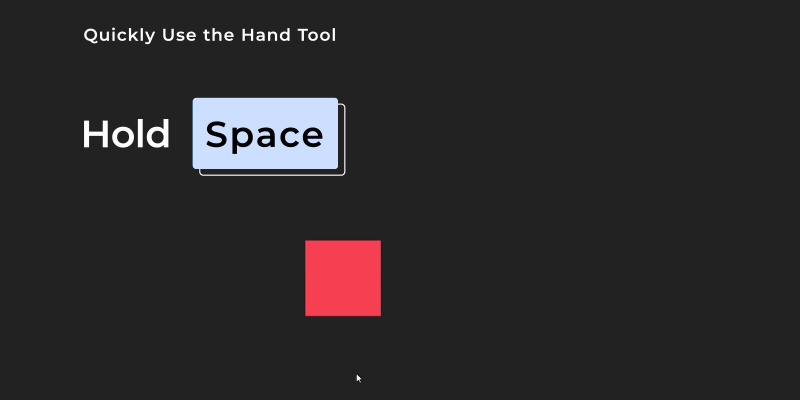
Navigating your comp panel is easy with the hand tool. But instead of selecting the hand tool from the toolbar, or hitting the H key for that matter, simply hold down the spacebar and drag.
7. Undo and Redo Actions
Shortcut: Command + Z; Command + Shift + Z
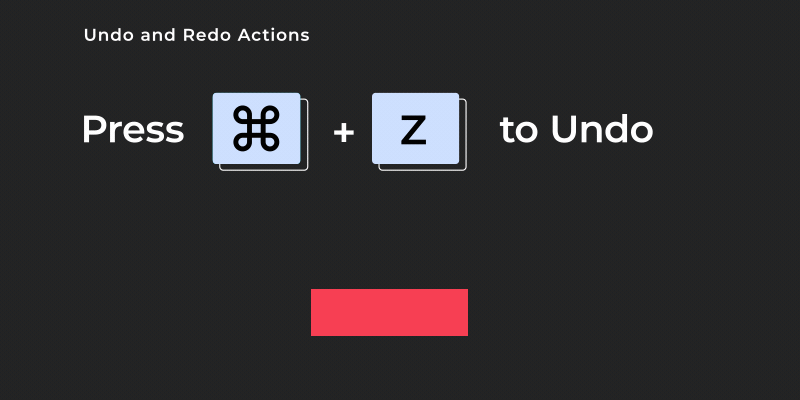
(Un)surprisingly, most newbies don’t know how to undo in After Effects—or they don’t know there’s a shortcut for that, at least. The Undo/Redo shortcuts are useful for quickly viewing the before and after effects of your work. To undo a completed action, press Command + Z. Use Command + Shift + Z to redo an action.
Layer After Effects Shortcuts
The following After Effects quick keys will make it easier for you to manipulate layers individually or in groups.
1. Jump to Layer In-Point or Out-Point
Shortcut: I or O
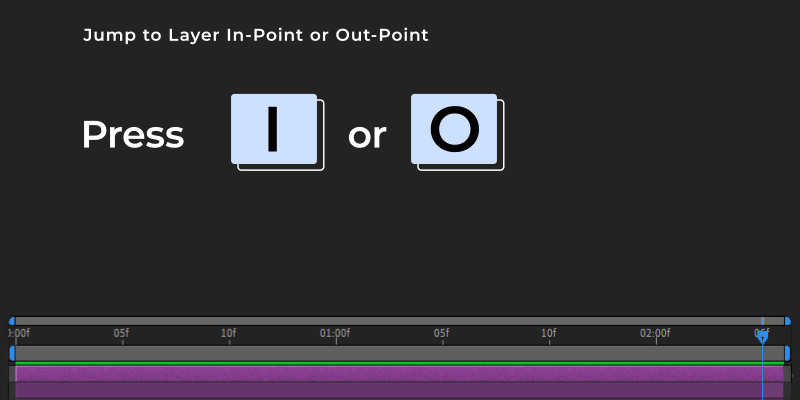
Simply hitting I on your keyboard moves you to the in-point (i.e., first frame) of a selected layer, and pressing the O key lets you navigate to the last frame. This will come in handy if you’re working with longer compositions.
2. Set Layer Start or End Point
Shortcut: [ or ]
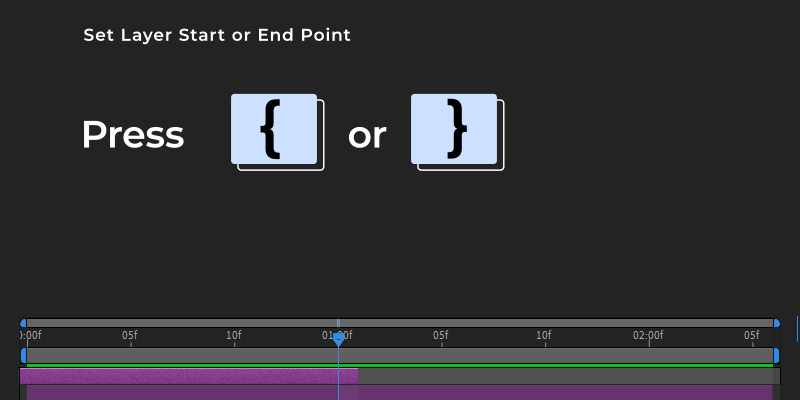
To move your selected layer to start or end at the playhead’s location, simply press the [ or ] key. This snaps the selected layer to the current playhead position, allowing you to manually adjust the layer’s timing.
3. Unlock All Layers
Shortcut: Command + Shift + L
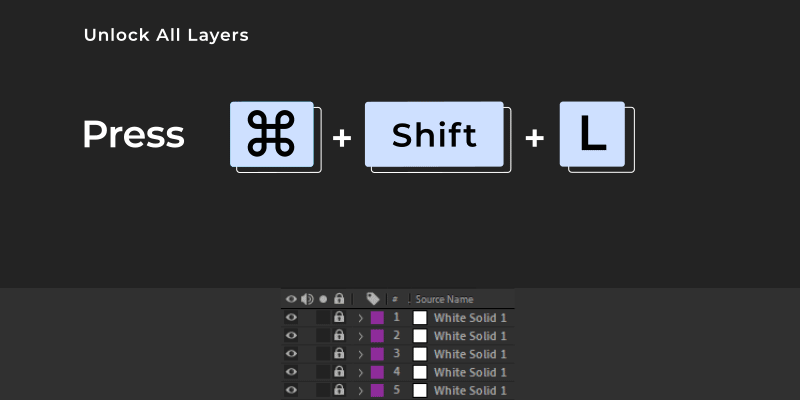
If you’re working with external projects (say, an outro template for YouTube videos), then it’s very likely that some layers were left locked. Instead of unlocking each layer one-by-one, simply hit Command + Shift + L to unlock all layers.
On the flip side, you can lock all (selected) layers with Command + L if you want to leave them untouched.
4. Fit Layer to Comp
Shortcut: Command + Option + Shift + H; Command + Option + Shift + G;

Say goodbye to the old way of manually adjusting layer dimensions using the transform properties. This key combination allows you to automatically scale the width or height of the layer to fit the composition.
5. Cycle through Layers
Shortcut: Command + ↑ or ↓
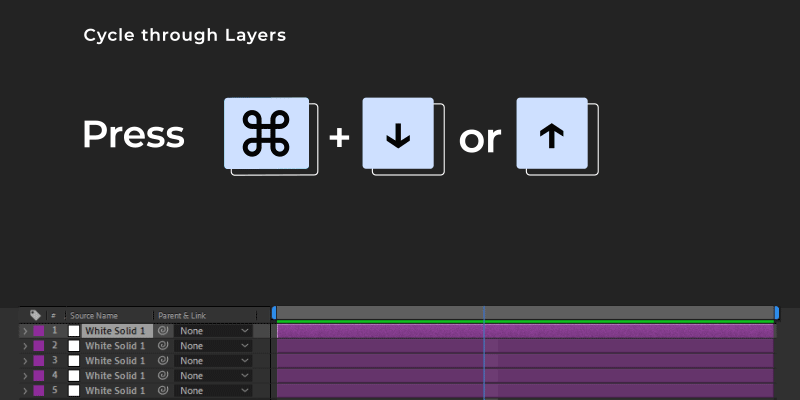
A common problem most people make is trying to select a layer and dragging it by mistake. Do this more than once, and things could get messy fast. To avoid this mistake, simply hit Command + Up (or Down) Arrow to cycle up (or down) through each layer.
6. Drag-Replace Layer Items
Shortcut: Option + Drag
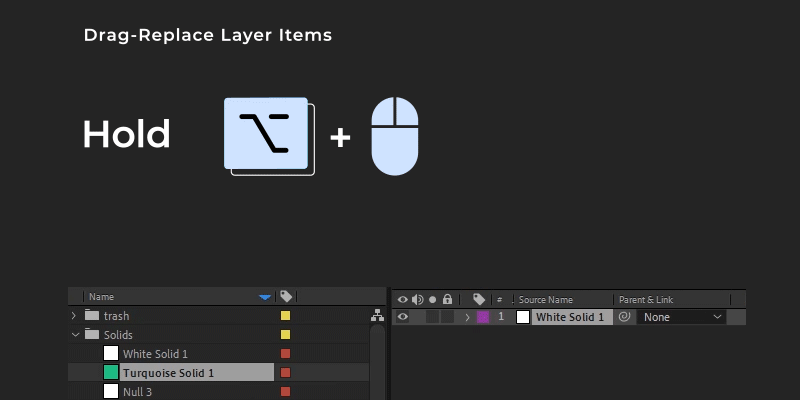
Did you know you can replace assets for selected layers in your timeline? This is a lifesaver when you have a pre-comp or asset in your timeline but you want to want to swap it out for another one. Instead of deleting the layer, the replace layer After Effects shortcut helps you simply replace the containing assets.
To do this, select a layer in your timeline, hold down the Option key, select an item in your project panel and replace by dragging the source item from the Project panel onto the selected layer.
7. Precompose Selected Layers
Shortcut: Command + Shift + C
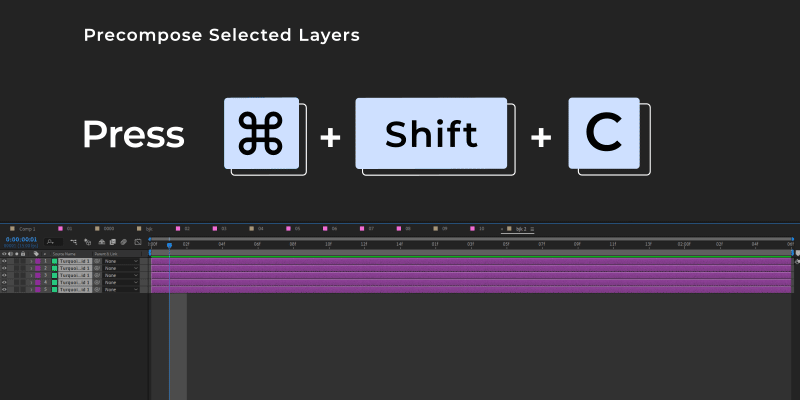
Precomposing layers allows you to arrange your work—or layers, specifically—as you see fit, so you spend less time looking for your project’s resources.
Precomposing is like organizing layers into folders. To precompose selected layers, simply hit Command + Shift + C.
After Effects Keyframe Shortcuts
1. Add a Keyframe Shortcut
Shortcut: Option + APSRT
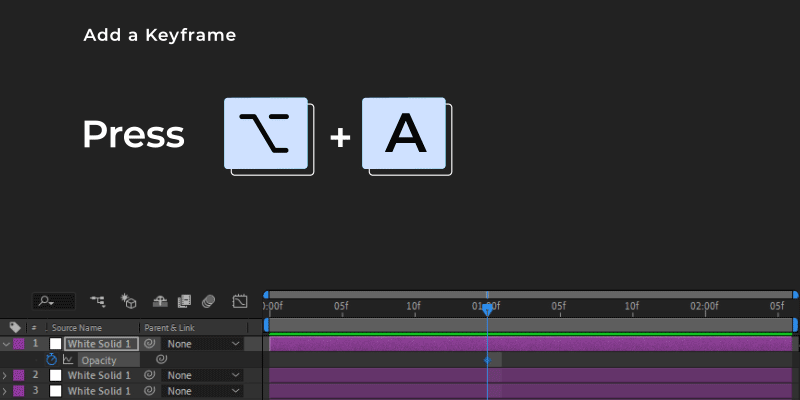
It can get tedious, clicking on the diamond icon or stopwatch spacebar every time you want to add a keyframe. Thankfully, there’s this easy “add a keyframe” shortcut After Effects ships with.
To add a keyframe shortcut in After Effects, simply hit Option with the corresponding shortcut for Anchor Point, Position, Scale, Rotation and Opacity.
Note: You can use the same keyboard shortcuts to remove a selected keyframe.
2. Easy Ease Selected Keyframes in After Effects
Shortcut: F9 (Easy Ease), Shift + F9 (Easy Ease In), and Command + Shift + F9 (Easy Ease Out)
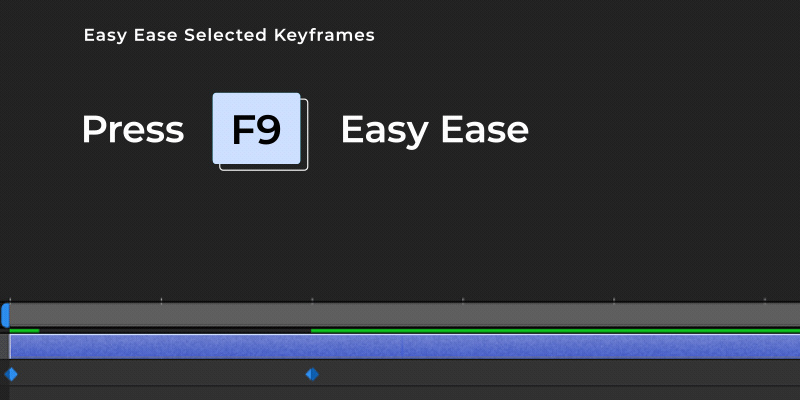
In After Effects, Easy Ease helps you automatically adjust the speed of a keyframe. Instead of calling up the Graph Editor every time you want to “Easily” Ease, you can simply use their shortcuts. You can apply Easy Ease (which lets you ease the speed coming both into and out of selected keyframes) by pressing F9.
To ease the speed when coming into a keyframe (i.e, Easy Ease In), hit Shift + F9. Similarly, to apply Easy Ease Out, press Command + Shift + F9.
3. Select All Keyframes Shortcut
Shortcut: Command + Option + A
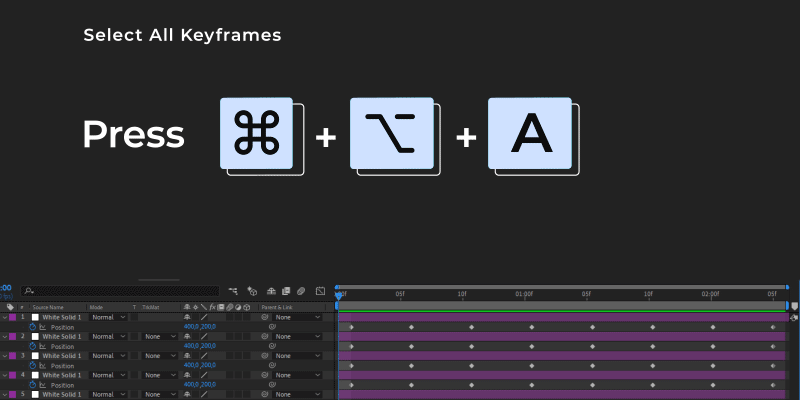
To show all keyframes in After Effects for a selected layer and their location in the timeline, hit U. Next, press Command + Option + A to select all keyframes After Effects has shown.
Also, you can select all keyframes for a property by clicking the property name in the timeline. Let’s say you wanted to select all keyframes for Scale, all you have to do is click on “Scale”.
The truth? Adobe After Effects is a powerful software which, sadly, intimidates a lot of designers. However, as you become more comfortable using it, you’ll have myriad reasons to label After Effects shortcuts a blessing. For one, working with your mouse alone in AE can be a real drag.
Learning all keyboard shortcuts in After Effects will take some time (no doubt). However, they’ll help you work faster once you give your mouse some rest. Our list of essential After Effects hotkeys will definitely come in handy, helping you breeze through your next project.
Want to know more about animation?

After Effects Keyframe Shortcuts
Adobe After Effects is arguably one of the most powerful creative tools (read: animation and visual effects software) available for professionals, particularly motion designers and VFX artists. If you’re a beginner or pro designer (does that even matter?), once you start to use After Effects religiously, you’ll recognize how super important it is to optimize […]
Best Animation Software and Motion Graphic Program to Use
Getting Started with Animation and Motion Graphics! When it comes to animation and motion graphics, the array of software and programs, free or otherwise, offer a daunting choice to beginners. “The best animation software” is largely relative, with each animator having their own personal preferences. To help newcomers out, we’ve compiled a list of the […]

Frame-by-Frame Animation Workflow in Photoshop
In this tutorial, Sasha will show you everything you need to know about frame-by-frame animation in Photoshop. You’ll learn the reasons behind choosing to animate your works in Photoshop, as well as its advantages and drawbacks for an animator. Moreover, you’ll discover how to create cool animation using the free AnimDessin2 plugin as well as […]