
In this quick tip, we want to show you the effect that making a skew transform. You have the skew option inside shape layers, but what if you’re going to apply it to the other layer types. In that case, you need the CC Slant effect. Enjoy!
Guide to CC Slant Effect in After Effects
After Effects is a powerful tool for creating stunning visual effects and animations. One of the many effects it offers is the CC Slant effect. CC Slant allows you to add a dynamic slant or perspective to your layers, giving them a sense of depth and dimension. In this comprehensive guide, we will explore the functionality, usage, and potential applications of the CC Slant effect. Whether you’re a beginner or an experienced practitioner, this tutorial will help you understand and master this effect.
Getting Started
To begin using the CC Slant effect, follow these steps:
- Launch After Effects and create a new composition by clicking on “Composition” in the menu bar and selecting “New Composition.” Set the desired settings for your composition, such as the resolution and duration.
- Import the footage or create a new shape layer that you want to apply the CC Slant effect to. You can do this by dragging and dropping the file into the project panel or creating a new shape layer using the “Shape” tool.
Applying the CC Slant Effect
To apply the CC Slant effect to a layer, follow these instructions:
- Select the layer you want to apply the effect to in the timeline or composition panel.
- Go to the “Effects & Presets” panel (usually located on the right side of the interface) and search for “CC Slant” in the search bar.
- Click and drag the CC Slant effect onto the layer in the timeline or composition panel.
Adjusting the CC Slant Effect Parameters
Once you have applied the CC Slant effect, you can modify its parameters to achieve the desired look. Here are the key parameters you can adjust:
- Slant Angle: Use the “Slant Angle” parameter to control the angle at which the layer is slanted. Positive values slant the layer to the right, while negative values slant it to the left.
- Slant Origin: The “Slant Origin” parameter determines the point of origin for the slant effect. You can set it to a specific point on the layer or use the “Pick Whip” icon to link it to another layer’s position.
- Scale: Adjust the “Scale” parameter to resize the layer along the slant axis. Increase the scale value to stretch the layer vertically or decrease it to compress it.
- Feather: The “Feather” parameter allows you to control the softness of the slanted edges. Higher feather values result in smoother transitions between the slanted and unslanted areas.
- Reflection Opacity: Use the “Reflection Opacity” parameter to adjust the opacity of the reflection created by the slant effect. Increase it to make the reflection more prominent or decrease it to make it less visible.
Creative Tips and Insights
Combining CC Slant with Other Effects
Experiment with combining the CC Slant effect with other effects in After Effects to create unique visuals. For example, try adding a glow or a drop shadow effect to enhance the slanted layers.
Animating the CC Slant Effect
You can animate the CC Slant effect parameters over time to create dynamic animations. Use keyframes to adjust the slant angle, slant origin, and other parameters at different points in your composition.
Multiple Instances of CC Slant
Apply the CC Slant effect to multiple layers in your composition to create complex slanting arrangements. Each layer can have its own slant angle and origin, allowing for intricate designs.
Precomposing Slanted Layers
If you want to apply additional effects or transformations to a slanted layer, consider precomposing it. This allows you to treat the slanted layer as a single entity and apply effects to it as a whole.
Potential Applications:
The CC Slant effect can be used in various scenarios to enhance your visual compositions. Here are some potential applications:
Typography Animation: Apply the CC Slant effect to text layers to create dynamic and engaging typography animations. Experiment with different slant angles and animations to bring your text to life.
Motion Graphics: Use the CC Slant effect to add a sense of depth and movement to motion graphics elements, such as shapes, icons, or logos. Combine it with other effects and animations for visually compelling designs.
3D-like Environments: By applying the CC Slant effect to multiple layers with different slant angles and origins, you can create a pseudo-3D environment with depth and perspective.
Isometric Designs: Achieve an isometric perspective by slanting the elements in your composition using the CC Slant effect. This technique is particularly useful for creating isometric illustrations or animations.
Conclusion
The CC Slant effect in After Effects is a versatile tool for adding depth, perspective, and dynamism to your compositions. By adjusting its parameters and combining it with other effects, you can achieve stunning visuals and animations. Experiment with different settings and explore its potential applications to unleash your creativity. With practice and exploration, you’ll master the CC Slant effect and create visually captivating projects in After Effects.
What is the Motion Beast course?
This is the must-see course for any Motion Designer. It lays the foundation for all aspects of modern motion design and covers every topic from AE basics to character rigging and frame by frame animation.
The course will help you overcome AE-related barriers and fears which are standing between you and the wonderful world of animation and motion design
ONLINE COURSE
Motion Beast
Breakdown of Frame-by-Frame Animation
In this short frame-by-frame animation tutorial, I’ll show you how to create and animate an illustration from scratch. We’ll start with a sketch and will go all the way up to post-production. To do this you’ll only need Photoshop for drawing and for frame-by-frame animation and After Effects to put it all together nicely and […]
Exponential scale in After Effects
How often you want to achieve the exponential scale. You’ve probably tried to do that with graph editor, but it’s almost impossible. In that case, we’ve prepared the two ways how to do it quickly.Right-click on selected keyframes, go to keyframe assistant, and choose an exponential scale. That’s it!Another way is to use the expressionWhich […]
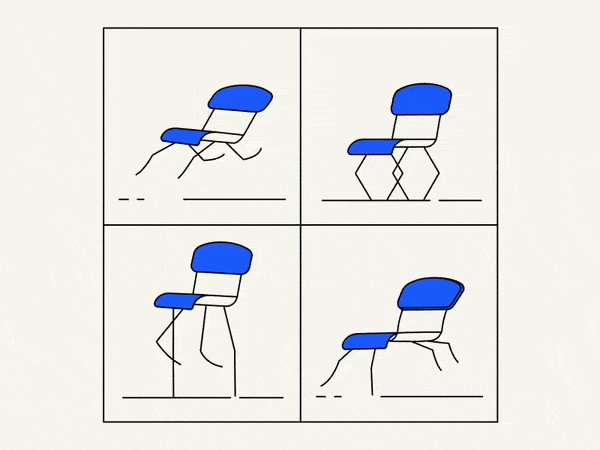
Running Chair Animation Breakdown in After Effects
New “How to” create a funny chair run cycle in After Effects.Step-by-Step Guide: Runnning Chair AnimationThe Running Chair Animation in After Effects is a creative and dynamic effect that can add visual interest and energy to your projects. It involves animating a chair to simulate movement as if it is running or sliding across the […]