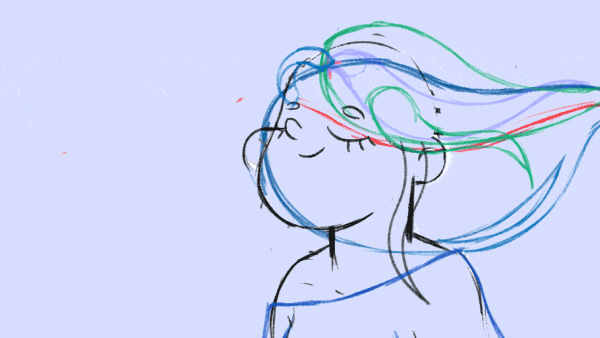
Hey guys! Here is a quick breakdown video on how hippie skater was made.
Skater Animation Breakdown in After Effects
Skater Animation is a popular technique used in After Effects to create dynamic and energetic animations that mimic the movement of a skater on a skateboard. This breakdown will guide you through the process of creating a Skater Animation step by step, covering the functionality, usage, and potential applications of this technique.
Before we dive into the tutorial, make sure you have Adobe After Effects installed on your computer. If you don’t have it yet, you can download a trial version from the Adobe website.
Let’s get started!
Step 1: Importing Assets
First, gather the assets you’ll need for your Skater Animation. This typically includes a skateboard image and a skater silhouette with separate body parts (head, torso, arms, legs). You can find these assets online or create your own.
- Launch After Effects and create a new composition by going to Composition > New Composition. Set your desired settings for the composition size, duration, and frame rate.
- Import the skateboard image and skater silhouette by going to File > Import > File. Locate the files on your computer and click “Open” to import them into your project.
Step 2: Setting up the Skater
Now, let’s set up the skater and prepare it for animation.
- Drag the skater silhouette onto the composition timeline. Position it at the starting point of the skater’s movement.
- Separate the skater’s body parts by using the Pen Tool. Click and drag on the edges of each body part to create a shape layer for the head, torso, arms, and legs. Ensure that each body part is on a separate layer.
Step 3: Creating the Skater Animation
In this step, we’ll animate the skater to create the illusion of movement.
- Select the Position property of each body part layer and add keyframes at the beginning and end of the animation. This will define the starting and ending positions for each body part.
- Move forward in the timeline to the point where you want the skater to reach the highest point of the jump or trick. Adjust the position of each body part to create the desired pose. Add keyframes to capture this pose.
- Continue moving forward in the timeline, adjusting the position of each body part to create a smooth transition between poses. Add keyframes as needed to refine the movement.
- Once you’ve completed the animation, preview it by pressing the Spacebar or using the Preview panel. Make any necessary adjustments to timing or positioning.
Step 4: Adding Skateboard Movement
To enhance the skater animation, let’s add movement to the skateboard.
- Drag the skateboard image onto the composition timeline, positioning it below the skater layers.
- Select the skateboard layer and apply the Puppet Pin Tool by going to Animation > Puppet > Puppet Pin Tool. This tool allows you to distort the image and create the illusion of movement.
- Place pins on the skateboard image at key points, such as the center of the wheels and the front and back of the board. This will be used to control the movement of the skateboard.
- Select the Position property of each pin and animate them over time to simulate the motion of the skateboard. Use keyframes to define the position of each pin at different points in the animation.
Step 5: Refining the Animation
To make your Skater Animation more polished and dynamic, let’s add some finishing touches.
- Apply Motion Blur to both the skater layers and the skateboard layer to create a sense of speed and fluidity. Enable motion blur by checking the box next to Motion Blur in the Timeline or Composition panel.
- Experiment with Easing to add more organic motion to the animation. Select the keyframes of the skater and skateboard layers, right-click, and choose Keyframe Assistant > Easy Ease. This will create smoother transitions between poses.
- Add any additional effects or elements, such as background graphics or text, to enhance the overall composition. Be creative and explore different options to make your animation unique.
Step 6: Exporting the Skater Animation
Congratulations! You’ve created a Skater Animation in After Effects. Now, let’s export it and share it with the world.
- Go to Composition > Add to Render Queue to open the Render Queue panel.
- In the Render Queue panel, select your desired output format and set the output destination by clicking on the Output To option.
- Adjust any additional settings, such as the output resolution or quality.
- Finally, click the Render button to start the rendering process. After Effects will process the animation and save it as a video file.
Conclusion
Skater Animation in After Effects is a fun and creative way to bring dynamic movement to your animations. By following this step-by-step guide, you’ve learned how to create a Skater Animation from start to finish, including importing assets, setting up the skater, animating the movement, adding skateboard movement, refining the animation, and exporting the final result.
Remember to experiment with different poses, timings, and effects to make your Skater Animation unique and visually stunning. Have fun and keep exploring the endless possibilities of After Effects!
What is the Motion Beast course?
This is the must-see course for any Motion Designer. It lays the foundation for all aspects of modern motion design and covers every topic from AE basics to character rigging and frame by frame animation.
The course will help you overcome AE-related barriers and fears which are standing between you and the wonderful world of animation and motion design
ONLINE COURSE
Motion Beast
Breakdown of Frame-by-Frame Animation
In this short frame-by-frame animation tutorial, I’ll show you how to create and animate an illustration from scratch. We’ll start with a sketch and will go all the way up to post-production. To do this you’ll only need Photoshop for drawing and for frame-by-frame animation and After Effects to put it all together nicely and […]
Exponential scale in After Effects
How often you want to achieve the exponential scale. You’ve probably tried to do that with graph editor, but it’s almost impossible. In that case, we’ve prepared the two ways how to do it quickly. Right-click on selected keyframes, go to keyframe assistant, and choose an exponential scale. That’s it! Another way is to use […]
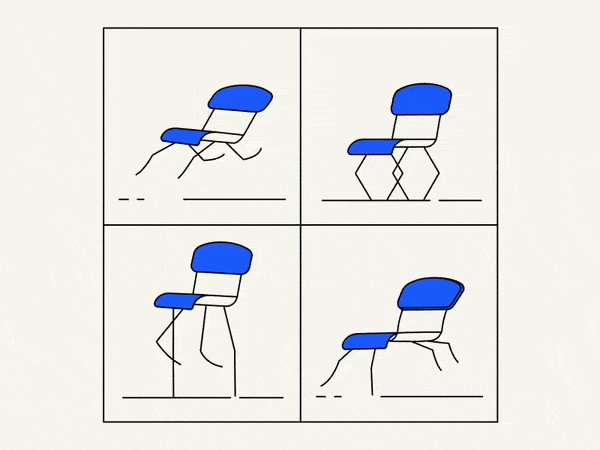
Running Chair Animation Breakdown in After Effects
New “How to” create a funny chair run cycle in After Effects. Step-by-Step Guide: Runnning Chair Animation The Running Chair Animation in After Effects is a creative and dynamic effect that can add visual interest and energy to your projects. It involves animating a chair to simulate movement as if it is running or sliding […]