
If you already got tired of having to endlessly create shape parallaxes to add at least a bit of volume to your work, this video will be your kick start into the world of real 3D and Cinema 4D. I’ll show you how to quickly make a simple 3D model, animate it in the easiest way and render it in 2D style to fit it organically into your animation!
In this guide, we will explore various 3D techniques to create captivating and dynamic 2D logo animations using Cinema 4D. Whether you are a beginner or an experienced practitioner, this comprehensive tutorial will equip you with the knowledge and skills to bring your logo designs to life. We will cover essential functionality, practical applications, and provide step-by-step instructions accompanied by visual aids and practical examples. So let’s dive in and unleash the creative potential of Cinema 4D!
Importing and Preparing the Logo
Before we start animating, we need to import the 2D logo into Cinema 4D and prepare it for the 3D techniques we’ll be using. Follow these steps:
- Launch Cinema 4D and create a new project.
- Go to the “File” menu and choose “Open” to import your 2D logo file.
- Position and scale the logo appropriately using the Move (E) and Scale (R) tools.
Extrusion
One of the fundamental techniques to add depth to your 2D logo is extrusion. Follow these steps:
- Select the logo object in the Object Manager.
- Right-click and choose “Cinema 4D Tags” > “Extrude.”
- In the Attribute Manager, adjust the “Height” parameter to control the extrusion depth.
- Experiment with other parameters like “Offset,” “Caps,” and “Subdivision” to achieve the desired effect.
Material Application
To enhance the visual appeal of your logo animation, applying materials is crucial. Let’s apply materials to different parts of the logo:
- Select the logo object in the Object Manager.
- Open the Material Manager (Shift + F8) and create a new material.
- Customize the material properties such as color, reflectance, and transparency.
- Drag and drop the material onto the logo object in the Viewport.
Lighting and Shadows
Proper lighting and shadows can add depth and realism to your logo animation. Let’s set up a basic lighting setup:
- Go to the “Create” menu and add a light source (e.g., “Omni Light”).
- Position the light source to illuminate the logo from a desired angle.
- Adjust the light’s intensity and color properties in the Attribute Manager.
- Enable “Shadows” in the light’s settings to cast realistic shadows.
Camera Animation
Animating the camera can bring a dynamic perspective to your logo animation. Let’s animate the camera to add movement:
- Go to the “Create” menu and add a camera (e.g., “Target Camera”).
- Position the camera to frame the logo in an appealing composition.
- Select the camera in the Object Manager and go to the “Animate” menu.
- Choose “Motion Camera” to enable camera animation.
- Set keyframes for the camera’s position, rotation, and other parameters to create movement.
Animation Effects
To further enhance your logo animation, consider adding animation effects such as rotation, scaling, and morphing. Here’s how:
- Select the logo object in the Object Manager.
- Go to the “Animate” menu and choose the desired animation effect (e.g., “Rotation”).
- Set keyframes for the effect’s parameters to control the animation over time.
- Experiment with other animation effects and techniques to achieve unique and engaging results.
Rendering and Exporting
Once you’ve created your logo animation, it’s time to render and export it for final use. Follow these steps:
- In the Render Settings (Ctrl + B), configure the desired output resolution, format, and quality settings.
- Choose a suitable output path for the rendered animation.
- Click the “Render to Picture Viewer” button to initiate the rendering process.
- After the rendering is complete, go to the “File” menu and choose “Export” to save the animation in a desired format.
Conclusion
Congratulations! You’ve learned various 3D techniques to create stunning 2D logo animations using Cinema 4D. By applying extrusion, materials, lighting, camera animation, and effects, you can transform a simple logo into a captivating visual experience. Remember to experiment, explore additional features, and let your creativity flow to create unique and engaging logo animations. Happy animating!
By the way, we’ve decided to feature this animation in 3 series to introduce you to various tips life hacks.
So if you are interested in logo animation and your dream is to start making money with it one day, subscribe to our channel and consider taking our ultimate on-line course on logo animation:
ONLINE COURSE
Logo Animation
in After Effects

Breakdown of Frame-by-Frame Animation
In this short frame-by-frame animation tutorial, I’ll show you how to create and animate an illustration from scratch. We’ll start with a sketch and will go all the way up to post-production. To do this you’ll only need Photoshop for drawing and for frame-by-frame animation and After Effects to put it all together nicely and […]
Exponential scale in After Effects
How often you want to achieve the exponential scale. You’ve probably tried to do that with graph editor, but it’s almost impossible. In that case, we’ve prepared the two ways how to do it quickly.Right-click on selected keyframes, go to keyframe assistant, and choose an exponential scale. That’s it!Another way is to use the expressionWhich […]
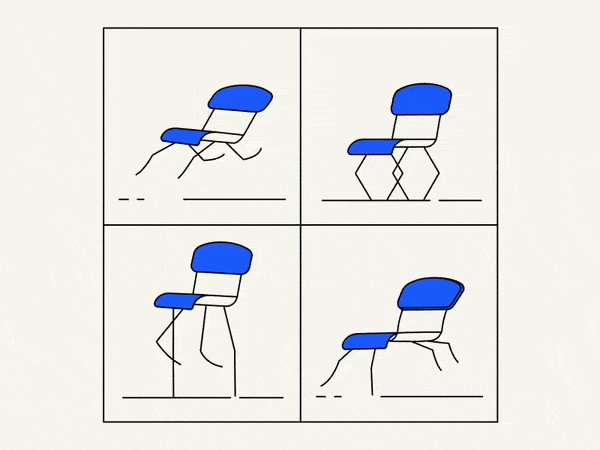
Running Chair Animation Breakdown in After Effects
New “How to” create a funny chair run cycle in After Effects.Step-by-Step Guide: Runnning Chair AnimationThe Running Chair Animation in After Effects is a creative and dynamic effect that can add visual interest and energy to your projects. It involves animating a chair to simulate movement as if it is running or sliding across the […]